
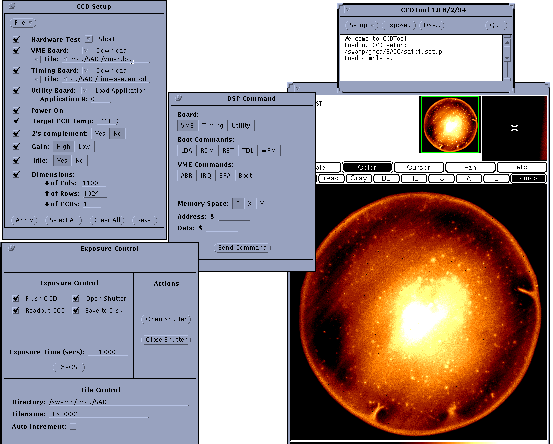
The program "ccdtool" is a windowing application for acquiring images and managing the San Diego State CCD controller. It is written in Kernighan and Ritchie "C" for the SUN operating system revision 4.1.3 and Solaris 2.x in the OpenLook graphical user interface. The current revision level is 1.3.1, which signifies that it is the first version released for non-developmental use. This revision was written entirely by John Denune of San Diego State while a master's degree candidate in computer sciences, before getting a job at Lowell Observatory.
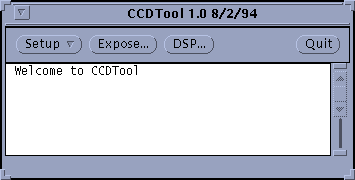
The program is invoked by entering "ccdtool" in an OpenLook window or by selecting the CCDTool item from the main menu. The window shown below will appear, with the "Welcome to CCDTool" message indicating that proper communication has been established with the VME interface board. The header gives the program name and revision level, and the three buttons below it and to the left create additional windows when pressed. Pressing the Quit button to the right will terminate program execution.
During program start-up CCDTool reads a file named
for initial configuration parameters. For the development system at SDSU the machine name is "suicide", so the file name is ccdtoolconfig.suicide. Seven of the parameters at the top of the file are labelled "ccdtool.vme.*" to indicate that they are initialization parameters used in configuring CCDTool to communicate with the VME interface board. Once these parameters are read by CCDTool it attempts to communicate with the interface board using the protocol described in the software chapter of the User's Manual. If the SUN does not succeed at writing to the VME interface board at all then the CCDTool window will momentarily flash on the terminal and a "bus error" will be reported. If the VME interface can be written to but does not send a reply to the SUN then the CCDTool window will appear, but its Expose, DSP and Quit buttons will not be activated, and pressing any of the buttons will result in no action being taken. If either of these two situations occur the VME interface board and the config file should be examined for consistency.
The configuration file can be edited directly outside of CCDTool before its executed, or altered with the "Configure VME..." option of the Setup window. This window allows alternative configuration files to be loaded from disk, or saved from the current configuration to disk, and allows the configuration parameters to be changed manually. Pressing the apply button of the window will cause CCDTool to issue a memory map call using the driver named in "VME Interface:" at the starting address indicated by "Base Memory Addr:" of a size "Memory Size:". A second memory map call will be made to the "Command Addr:", and an SRA ("Set Reply Address") command will be issued to the VME interface board using the address "Reply Addr:" specifying where it is to write its replies. If either the mapping calls or the SRA command do not successfully execute a configuration error message is returned. The CCD images are written starting at "Image Addr:". The command address should be outside the Base + Size memory map space, and the reply and image addresses should be inside it. The "Memory Offset:" entry indicates the difference between SUN addresses and VMEbus addresses, and is set to 0x1000.0000 for the Themis CPU.
The white area below the buttons is a scrolling display window that reports program operation to the user. In this example a file named "SAIC.setup" containing operating parameters for the Setup window file has been loaded from disk. The scrollbar to the right allows unseen text to be examined, and the screen can be expanded by dragging the corners.
In the default configuration the window reports completion of requested operations or error conditions. A more comprehensive operating log can be enabled by pressing the Setup button with the right mouse button, and selecting the "Properties..." window, and enabling the "Show Commands" option. This will print all commands sent to the controller boards, including the VME interface board, as well as their replies to the SUN. It can be useful for troubleshooting, though it significantly slows program execution because of the time needed to update the display window.
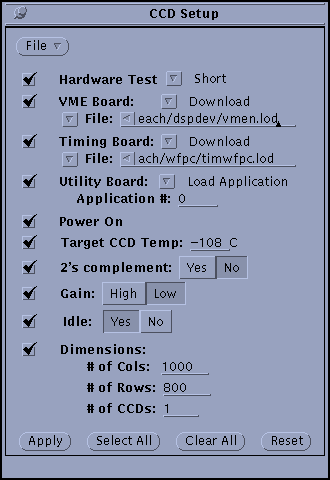
Two of the functions of the Setup window (Properties and the Configure VME) have been discussed above in the CCDTool section. The "Configure CCD..." window is used to set all operating parameters relating to the CCD and its readout, and to load appropriate software to the three DSPs in the controller. Placing the mouse on the "Setup" button of the CCDTool window and clicking the mouse left button once will bring up the CCD Setup window with its long list of file names and parameters, shown below.
The "File" button at the top of the CCD Setup window allows the contents of the window to be read from a disk file with the "Load CCD Setup..." option, and for the current contents of the window to be saved in a disk file with the "Save Current CCD Setup As..." button. Default values of the Setup can be saved in the /usr/local/etc/ccdtool/ccdtoolconfig* file along with the VME configuration parameters in the .setup. lines. This can be quite useful once a standard operating mode has been developed. The default parameters will be loaded into the Setup window but the user must still Apply them by hitting the button.
A check mark to the left of each line will cause that item to be executed when the "Apply" button of the window is pressed, and items are executed in order from the top to the bottom of the window. Clicking on "Select All" will check all the items so they will all be executed when "Apply" is clicked, and "Clear All" will uncheck all the items. Clicking "Reset" will set the contents of the window back to the values last read in from disk, either the default values when the program started up or values last read in with the "Load CCD Setup..." button.
The three DSPs located in the controller must have application software loaded into them to operate CCDs. These are the VME, timing and utility boards. Software can either be downloaded from the SUN by writing the contents of a compiled and linked DSP load file written by the Motorola linker. The download procedure executes by repeatedly calling the WRM (Write to Memory) command that is implemented as a boot command that is loaded into each DSP during power-up or after being reset. The load file is specified on the "File:" line. Alternatively, application software can be loaded into the DSP from on-board EEPROM with the Load Application (LDA) command, which requires an application number from 0 to 9.
Several scripts have been written to generate the application software load files. The boot, or system, program is linked with each application program and put into the load file even though it is not downloaded so that the application program has correct addresses to jump to. It is vital that the boot program be used for generating the download files be exactly the same as the boot program resident in the boot EEPROM on the board so addressing conflicts are eliminated. There are currently no safeguards against this and the symptoms of it having been done are minimal - the system just dies.
A description of each item in the Setup window follows:
Hardware Test - The TDL (Test Data Link) command is executed a small number of times to the VME, timing and utility boards to check for basic operation of the DSPs and the communication between them.
VME Board - Load application software into the DSP from the SUN or from on-board EEPROM.
Timing Board - Load application software into the DSP from the SUN or from on-board EEPROM.
Utility Board - Load application software into the DSP from the SUN or from on-board EEPROM.
Power On - Turn analog power (+/- 15, +30 volts nominal) on to the controller backplane. The power control board does this on command from the utility board.
Target CCD Temp - Set the value to which the utility board will regulate the CCD temperature. The regulator works by heating a small resistor near the CCD to counteract the cooling system, so the resistor can be turned off entirely by entering a low value (say -200 C) if the heater has already been activated, or by no checking the item at all. A linear equation is used to convert from the number in ADU read from the 12-bit A/D converter on the utility board that is connected to the temperature sensing diode on the dewar cold finger:
2's complement - The VME interface board will convert incoming straight binary values from the analog board 16-bit A/D to two's complement convention if this item is applied.
Gain - The analog board has a gain switching resistor network that can be switched between low and high gain. The conversion gain constant for the system will also change.
Idle - When the CCD is neither clearing, reading out or exposing the readout clocks can be made to clock if the Idle mode is enabled.
Dimensions - The number of columns and rows expected from an image readout is entered here. These parameters are sent to the VME interface and timing boards. The number of readout only controls the size of the file created by CCDTool, and the user must be sure to load the appropriate DSP code into the VME interface and timing boards. The disk file created by CCDTool will be - NCCDS x Ncols x Nrows x 2 bytes in length, then incremented by 2880 bytes to accommodate the FITS header and then rounded up to the nearest 2880 bytes.
When the Setup procedure is executing the four buttons at the bottom will be replaced by a button labeled "Abort Setup". This can be pressed by the user if the setup seems to be hung up, as can occur if one of the boards fails to give a reply to a command. The current Setup operations will be suspended and the four buttons will reappear at the base of the window. Currently there is no automated time-out so the user needs to watch for the setup operation taking longer than expected. With the CCDTool display area set for error reporting only (no commands) the setup takes less than a second to execute in its entirety, including the download of two large application files. With command reporting on it takes much longer - maybe a minute or so.
The program scans the list of parameters and filenames before executing any of the items to check if the filenames exist and if the parameters are in range. If any of them aren't an error message is generated inviting a correct entry, after which the user should re-apply.
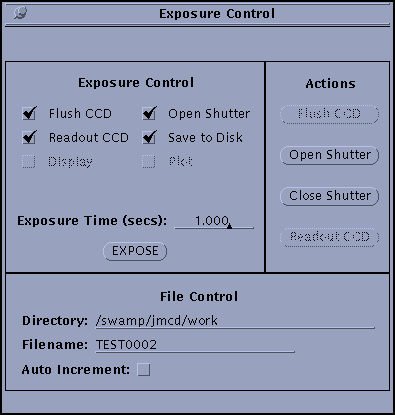
Once the controller and CCDTool program parameters have been set exposures can be taken with the Exposure. Shown below it can be seen to be divided into three areas - for exposure control, action and file control functions. The exposure control has an expose button that is pressed to begin an exposure sequence that consists of executing the items that are checked. The checked items are executed in order from left to right, top to bottom. Dark frames can be obtained by simply unclicking the "Open Shutter" item. The time to write to disk can be eliminated by unclicking the "Save to Disk" item. The exposure time is entered as an integer or floating point number, and is effective to a resolution of one millisecond and up to times of 2**24 milliseconds, or 4.66 hours. For exposures greater than five seconds a crude exposure timer appears in the footer of the window. During exposures the "Expose" button turns into an "Abort Exposure" button that will abort the exposure when pressed. Presently though the program seems to freeze when his is done, so caution should be exercised until its fixed.
The "Actions" area send commands to cause an immediate action, quite apart from and exposure sequence. Presently only shutter open and close are implemented, and are used mostly for system testing.
The "File Control" area assigns a file name to the disk file containing the image. They are written in FITS format with a minimal set of header values presently implemented. The program starts out with the directory set to that in which CCDTool was executed from, and with no filename. If the filename is entered with a few numerical characters at the end then the "Auto-Increment" feature will increment the filename with each exposure, and display the new one each time.
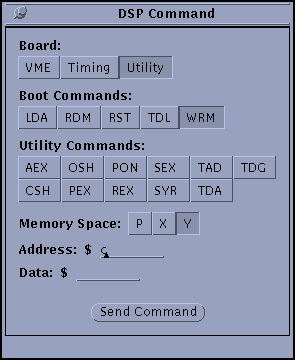
Individual commands can be sent to any of the three DSP-containing boards from the DSP window. It is invoked with the button on the CCDTool window. Five commands are common to all three boards and are resident in the boot program
LDA - Load Application - to load a numbered application program from on-board EEPROM
RDM - Read Memory - Read DSP or EEPROM memory
RST - Reset - Reset the DSP and load its boot program from EEPROM
TDL - Test Data Link - write back the argument as a system test
WRM - Write to Memory - Write to DSP or EEPROM memory
Depending on the command the "Memory Space:", "Address:" or "Data:" label will darken if an entry in needed for proper command execution. Number (in hex) should be entered, and the "Command" button pressed to execute the command. All commands give replies to the program, which are displayed at the bottom of the window in the footer. Some commands, such as RDM, give numerical values, while others give the 'DON' reply to indicate that the command executed successfully. Unsuccessful command execution is indicated by an 'ERR' reply. No reply is indicated by the "Command" button remaining discolored and the program freezing up. An "Abort Command" button similar to the one on the Setup and Expose windows has not yet been implemented.
Following these are application commands that are specific to each board. Clicking on the board selection causes a different set of commands to appear below the boot command list. They execute similarly to the boot commands.
The only provision now implemented for reading the actual CCD temperature is with this DSP window. It can be done by reading the value of Y:$C on the utility board, and inserting the number in the temperature conversion formula above. The target temperature is located at Y:$1C, and can be compared to the actual temperature.
1. Aborting exposures doesn't really work. The system freezes.
2. Some of the exposure sequence options haven't been tested. Exposing without clearing the CCD or reading out will not work, but exposing without opening the shutter or saving to disk works fine.
3. If any of the boards undergo a hardware reset for any reason CCDTool has no way of knowing about it, and will hang up.
4. The selection Show Commands in the Properties submeu of the Setup window gets reset to Show errors if the Setup window contents are re-applied.
1. The temperature readout not convenient.
2. The hardware test item in the Setup needs to be more flexible by allowing many more tests, and to be made seperately to each board.
3. If an error is received on a reply it is simply reported. The program should terminate its execution sequence and report it more compellingly to the user.
4. Stricter consistency checks in the setup should be done, such as may exist between the number of CCDs requested and the timing and VME board application software loaded, or between the image sizes used by the timing and VME boards. These inconsistencies will now cause the program to hang rather badly.
1. The program reads the current reply address to see if a new reply from the VME interface has been generated. A more efficient scheme is to make the VME board generate interrupts and write a simple device driver in SUN OS to read the reply on interrupt.
2. A facility to execute command sequences, or scripts, is planned. These would be stored on disk and executed a settable number of times.
 Back to Document List Page.